
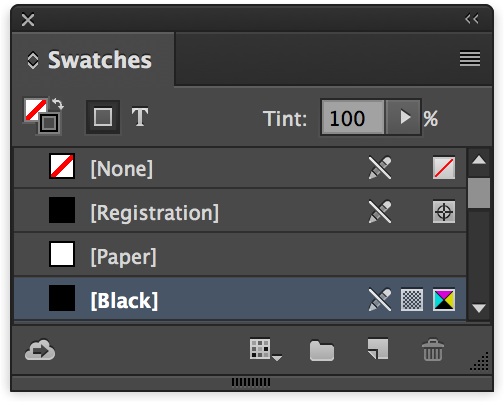
When printing in black only, all text and images should use the InDesign default colour [Black] swatch. No other colours or colour modes (such as spot colours, [Registration], RGB, Pantone or LAB) should be used.
This also applies to any stroke (border) colours and fill (solid) colours.
It’s Ok to use tints—any tint of [Black] from 1-100% is acceptable, but avoid using a 0% tint because this becomes white and can mess up overprinting.

For GreenLight Custom Users this recently added GreenLight check determines whether the price stated on the book’s cover artwork matches the information in the Book Info Panel.
Book Info is now shown in a new Book Info Panel on the pasteboard to the left of the first spread.
Book Info is initially set using the same GreenLight menu > Add / Amend Book Info command.
Data in the Book Info Panel is live and can be amending directly in the panel or with the Add / Amend Book Info command
Typically, all CMYK objects are not set to overprint. By setting an object on the CMYK layer to overprint it may interact differently with the inks below and cause unwanted results in print.
To safeguard against this happening by accident, this check requires InDesign users to mark objects and graphics that have been set to overprint as having been done intentionally.
Objects in InDesign can have overprint assigned to their fill and stroke colours:
With object(s) selected, apply overprinting using the InDesign Attributes panel (Window > Output > Attributes)
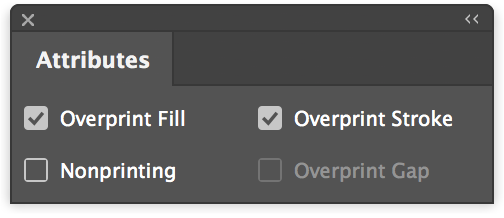
Note that overprint can only be added to object fill and strokes that have a colour applied which is not [Paper] or [None].
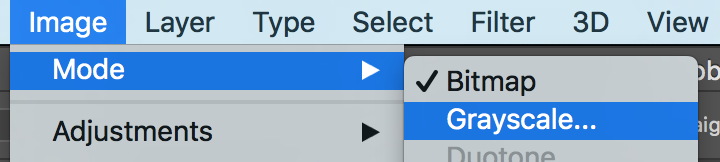
Bitmap images (referred to as ‘Black and White’ images in the InDesign Links panel) and Grayscale can be set to overprint using InDesign:
Pixel images used on the text layer are saved as either Bitmap or Grayscale in Photoshop.
To then apply overprint to pixel images it is important to select the content of the image frame rather than the image frame itself. Do this using the InDesign Direct Selection Tool or with a graphic frame selected choose (Object > Select > Content)
With an appropriate image selected in this way, apply overprinting using the InDesign Attributes panel (Window > Output > Attributes).
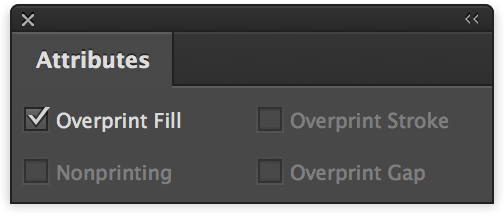
After selecting an image with the Direct Selection Tool tick the checkbox to apply Overprint Fill.
It is also possible to apply overprinting using Illustrator’s Attributes panel (Window > Attributes):

After selecting the Illustrator artwork with the Direct Selection Tool tick the checkbox to apply Overprint Fill and/or Stroke.
Note: GreenLight is not currently checking vector artwork from Illustrator.
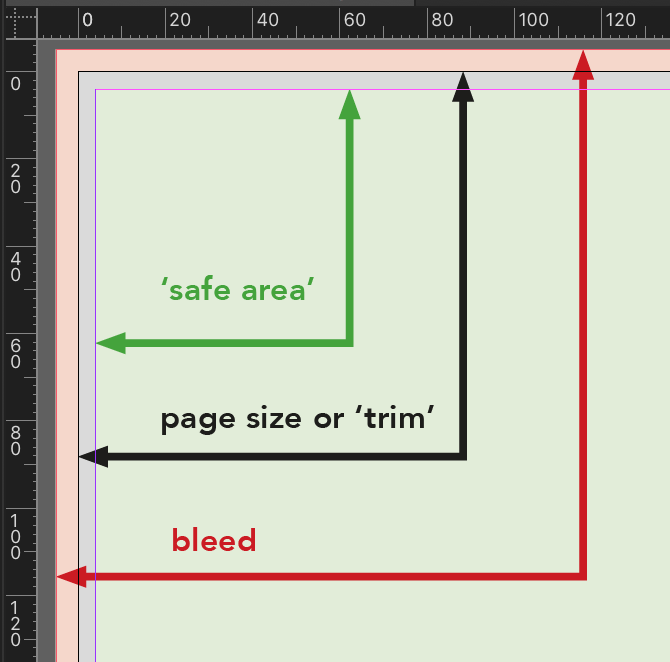
The bleed area is set and altered in the InDesign File menu > Document Setup dialog.
Covers and jackets are usually trimmed down from the larger sheet that they are printed on as part of the production process. This process can have a tolerance of a few millimetres and so a bleed area on all sides – of e.g. 5mm – is a requirement to prevent any unsightly errors.
A PLC (a printed laminated cover or paper laminated case, depending on who you ask!) is a hardcover book with the printed cover glued onto it.
A FLEXI is similar but with a more flexible medium weight case.
The wider overlaps required when gluing mean the correct amount of bleed for a PLC or FLEXI file is set at 15mm.
This check looks at the name of the document and then accordingly checks for a 5mm bleed or a 15mm for PLC or FLEXI documents.
Layers are an important method of separating different objects on the InDesign page and can be used for splitting text which changes with different languages from common images in a co-edition print run.
The full list of layers that are expected and allowed are different for covers / jacket files and inside pages are as follows:
Choose InDesign Window menu >Layers to see the current setup for your document in the Layers panel.

TEXT
All objects that are able to edited, moved or removed by a translator. Usually text objects but can also contain annotation lines, tint panels, text wrap objects.
The full name of the translation layer contains the language being used. e.g.
TEXT-UK - International English
TEXT-US - Americanized English
TEXT-SPA - Spanish
TEXT-GER - German
Typically only one text layer is included in an InDesign document but it is possible to have multiple text layers if required.
CMYK
This layer contains images that are consistent between each translation.
This layer can contain any combination of colour objects and placed images and may include transparency effects and blending.
It should not contain any translatable text.
The common images layer is named ‘CMYK’ and is the bottommost layer in the layers panel
NOTES
A layer named ‘NOTES’ can be added if required whilst a document is either work in progress or final. Anything added to this layer remains in the InDesign document but is not included when outputting PDF or translation files.
Therefore it is important to be sure that the notes layer does not contain any objects intended for print.
If required, multiple notes layers can be used, with each note layer name starting with the word ‘NOTES’. Notes layers should appear on top of other layers.
Covers and jackets are not printed in a co-edition print run and are likely to include special print finishes such as foil and spot lamination.
Finishes are separated out onto different layers in InDesign and named to describe their contents.
Expected layer names for cover and jacket files ONLY include "FOIL", "DIELINE", "SPOTUV", "MATT", "GLITTER", “DEBOSS” and "EMBOSS". Other layer names start with the word “SPECIAL” e.g. “SPECIAL-GLITTER”
Note: Any spot colours e.g. Pantones are not split onto separate layers and are included with the main CMYK graphics.
Layers are an important method of separating different objects on the InDesign page and can be used for splitting text which changes with different languages from common images in a co-edition print run.
The full list of layers that are expected and allowed are different for covers / jacket files and inside pages are as follows:
Choose InDesign Window menu >Layers to see the current setup for your document in the Layers panel.
TEXT
All objects that are able to edited, moved or removed by a translator. Usually text objects but can also contain annotation lines, tint panels, text wrap objects.
The full name of the translation layer contains the language being used. e.g.
TEXT-UK - International English
TEXT-US - Americanized English
TEXT-SPA - Spanish
TEXT-GER - German
Typically only one text layer is included in an InDesign document but it is possible to have multiple text layers if required.
CMYK
This layer contains images that are consistent between each translation.
This layer can contain any combination of colour objects and placed images and may include transparency effects and blending.
It should not contain any translatable text, lines of text wrap areas.
The common images layer is named ‘CMYK’ and is the bottommost layer in the layers panel
GUIDES
One or more layers with names starting with the word GUIDES can be added if required whilst a document is work in progress or final. Anything added to a guides layer is not typically included when creating final PDF files. If required, a PDF of the guides layers present in a document can be chosen by choosing to output specific layers.
Guides layers are included when preparing translation material.
Guides layers that remain in the final InDesign documents are included in archive file sets.
NOTES
One or more layers with names starting with the word NOTES can be added if required whilst a document is work in progress or final. Anything added to a NOTES layer is not included when creating final PDF files or translation material.
Therefore it is important to be sure that the notes layer does not contain any objects intended for print.
Notes that remain in the final InDesign documents are included in archive file sets.
Covers and jackets are not printed in a co-edition print run and are likely to include special print finishes such as foil and spot lamination.
Finishes are separated out onto different layers in InDesign and named to describe their contents.
Expected layer names for cover and jacket files ONLY include "FOIL", "DIELINE", "SPOTUV", "MATT", "GLITTER", “DEBOSS” and "EMBOSS". Other layer names start with the word “SPECIAL” e.g. “SPECIAL-GLITTER”
Note: Any spot colours e.g. Pantones are not split onto separate layers and are included with the main CMYK graphics.
Layers are an important method of separating different objects on the InDesign page and can be used for splitting text which changes with different languages from common images in a co-edition print run.
The full list of layers that are expected and allowed are different for covers / jacket files and inside pages are as follows:
Choose InDesign Window menu >Layers to see the current setup for your document in the Layers panel:

TEXT
All objects that are able to edited, moved or removed by a translator. Usually text objects but can also contain annotation lines, tint panels, text wrap objects.
The full name of the translation layer contains the language being used. e.g.
TEXT-UK - International English
TEXT-US - Americanized English
TEXT-SPA - Spanish
TEXT-GER - German
Typically only one text layer is included in an InDesign document but it is possible to have multiple text layers if required.
CMYK
This layer contains images that are consistent between each translation.
This layer can contain any combination of colour objects and placed images and may include transparency effects and blending.
It should not contain any translatable text.
The common images layer is named ‘CMYK’ and is the bottommost layer in the Layers panel
GUIDES
One or more layers with names starting with the word GUIDES can be added if required whilst a document is work in progress or final. Anything added to a guides layer is not typically included when creating final PDF files. If required, a PDF of the guides layers present in a document can be output by choosing specific layers.
Guides layers are included when preparing translation material.
Guides layers that remain in the final InDesign documents are included in archive file sets.
NOTES
One or more layers with names starting with the word NOTES can be added if required whilst a document is work in progress or final. Anything added to a NOTES layer is not included when creating a final PDF files or translation material.
Therefore it is important to be sure that the notes layer does not contain any objects intended for print.
Notes that remain in the final InDesign documents are included in archive file sets.
Covers and jackets are not printed in a co-edition print run and are likely to include special print finishes such as foil and spot lamination.
Finishes are separated out onto different layers in InDesign and named to describe their contents.
Expected layer names for cover and jacket files ONLY include "FOIL", "DIELINE", "SPOTUV", "MATT", "GLITTER", “DEBOSS” and "EMBOSS". Other layer names start with the word “SPECIAL” e.g. “SPECIAL-GLITTER”
Note: Any spot colours e.g. Pantones are not split onto separate layers and are included with the main CMYK graphics.
Layers are an important method of separating different objects on the InDesign page and can be used for splitting text which changes with different languages from common images in a co-edition print run.
The full list of layers that are expected and allowed are different for covers / jacket files and inside pages are as follows:
Choose InDesign Window menu >Layers to see the current setup for your document in the Layers panel.
TEXT
All objects that are able to edited, moved or removed by a translator. Usually text objects but can also contain annotation lines, tint panels, text wrap objects.
The full name of the translation layer contains the language being used. e.g.
TEXT-UK - International English
TEXT-US - Americanized English
TEXT-SPA - Spanish
TEXT-GER - German
Typically only one text layer is included in an InDesign document but it is possible to have multiple text layers if required.
CMYK
This layer contains images that are consistent between each translation.
This layer can contain any combination of colour objects and placed images and may include transparency effects and blending.
It should not contain any translatable text, lines of text wrap areas.
The common images layer is named ‘CMYK’ and is the bottommost layer in the layers panel
GUIDES
One or more layers with names starting with the word GUIDES can be added if required whilst a document is work in progress or final. Anything added to a guides layer is not typically included when creating final PDF files. If required, a PDF of the guides layers present in a document can be chosen by choosing to output specific layers.
Guides layers are included when preparing translation material.
Guides layers that remain in the final InDesign documents are included in archive file sets.
NOTES
One or more layers with names starting with the word NOTES can be added if required whilst a document is work in progress or final. Anything added to a NOTES layer is not included when creating final PDF files or translation material.
Therefore it is important to be sure that the notes layer does not contain any objects intended for print.
Notes that remain in the final InDesign documents are included in archive file sets.
Covers and jackets are not printed in a co-edition print run and are likely to include special print finishes such as foil and spot lamination.
Finishes are separated out onto different layers in InDesign and named to describe their contents.
Expected layer names for cover and jacket files ONLY include "FOIL", "DIELINE", "SPOTUV", "MATT", "GLITTER", “DEBOSS” and "EMBOSS". Other layer names start with the word “SPECIAL” e.g. “SPECIAL-GLITTER”
Note: Any spot colours e.g. Pantones are not split onto separate layers and are included with the main CMYK graphics.
If no Book Info is found by GreenLight, the check returns the following warning:

You can add to / amend your document’s Book Info by choosing GreenLight Run menu > Add / Amend book info for document):
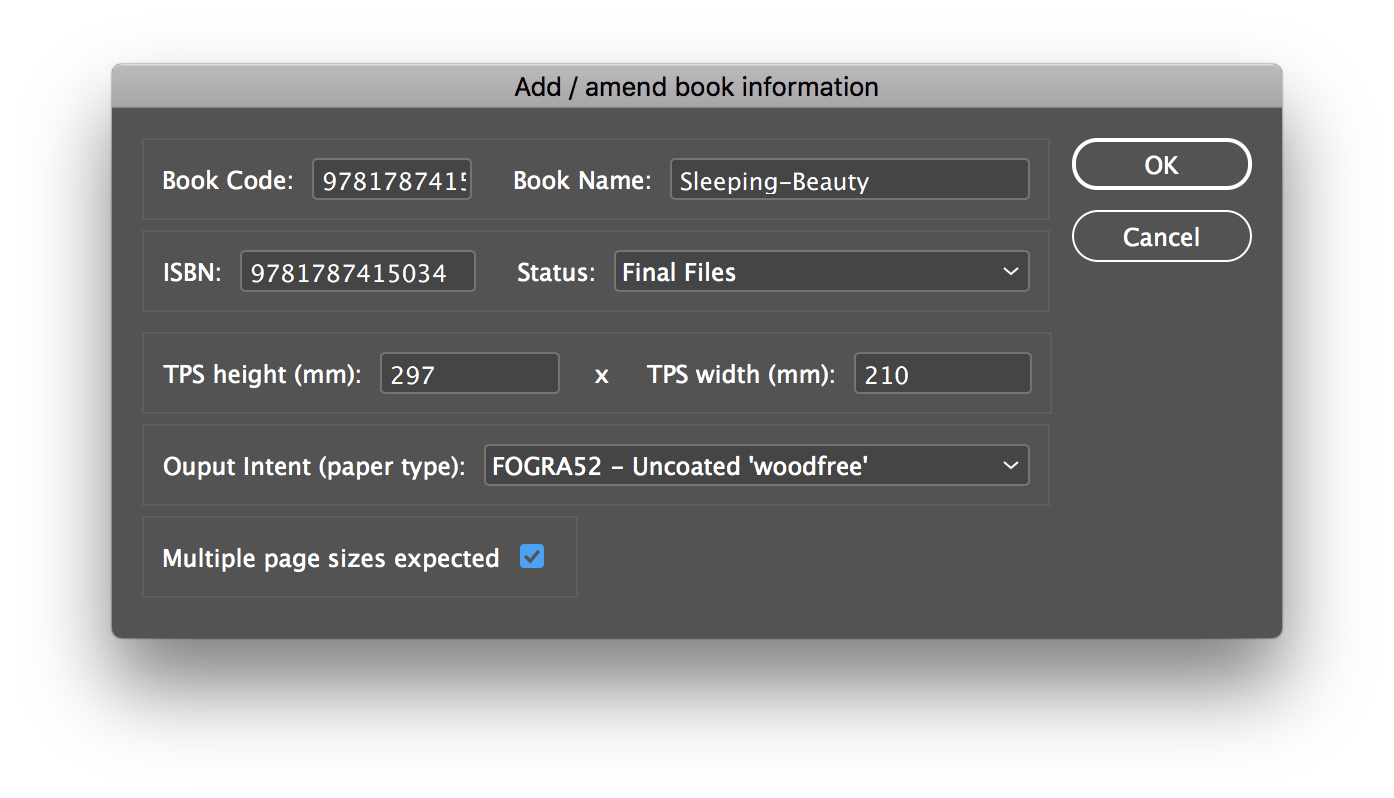
Add the required trim page size in the TPS height and width fields in millimetres. Other important book information can also be added and amended here.
Each page of the InDesign document is then checked against the entered TPS sizes.
If different page sizes are to be expected in the same document (e.g. for gatefolds or other complex pages) then an option to mark Multiple page sizes expected can be ticked. With this option ticked GreenLight will confirm that multiple page sizes have been found.
Tip: It is possible to change the size of all pages in an InDesign document using the Document Setup dialog (InDesign File menu > Document Setup…) and individual pages using the Page Tool.

GreenLight simplifies the setting and application of colour profiles to previews and exports.
This GreenLight check flags when the Colour Profile for the InDesign document has not yet been set in the GreenLight Book Info panel. To fix this issue the user needs to choose from the paper types offered in the Book Info panel, which can be accessed from GreenLight Run menu > Add / Amend Book Info.
A dropdown menu in the Book Info panel gives a choice of setting the Document Profile (also known as the ‘output intent’ when exporting to Print Ready PDFs) according to the File Creation Policy.
The options are present in the Output intent (paper type) dropdown menu. If the GreenLight client does not apply a default, and instead requires users to make a conscious choice then this is left set to *** please choose *** until a selection has been made.

On PDF export these colour profiles are applied to the document artwork and placed images.
If you are unsure of which colour profile to use, ask your publisher contact for more information on the paper type being used for your print job.
For GreenLight Custom Users this GreenLight check determines whether the ISBN stated on the book’s cover artwork matches the information in the GreenLight Book Cover Panel.
Book Info is now shown in a new GreenLight Book Cover Panel on the pasteboard to the left of the first spread.
Book Info is initially set using the same GreenLight menu > Add / Amend Book Info command.
Data in the Book Info Panel is live and can be amending directly in the panel or with the Add / Amend Book Info command
Using templates in InDesign can help ensure that there is consistency from one document to another and that the documents are correctly set up regarding aspects such as colour, size, fonts used, bleed settings, colour management, Paragraph and Character Styles and more.
GreenLight makes it easy to start a new jacket file by generating a new InDesign document.
The dimensions, style and name of the newly created jacket file is taken from the information entered into a dialog.
(GreenLight Run menu > Make / alter cover) opens a dialog for entering the book information and trim page sizes required.
To make a new jacket to match an existing internal file, open the internal file in InDesign before choosing the Make new jacket from template command and information such as book code, ISBN and trim page size will be brought into the new jacket dialog automatically.
For further information on creating a jacket template please see Making Jackets and Covers
The InDesign Articles panel has no effect on Fixed Layout EPUBs and should not be used for InDesign documents destined for that type of output.

‘Process Colours’ are the Cyan, Magenta, Yellow and Black inks used in the CMYK print process.
While the vast majority of commercial print jobs are printed in CMYK, some workflows use different combinations of inks, e.g. just two inks (duotone) or just three inks (tritone).
The use of limited spot colour inks, typically PANTONE inks, can give different design options and challenges and alter the cost of production and it is advised to check with production before using.
Typically, when producing a book with a limited number of spot inks, the Cyan, Magenta and Yellow plates are not required. This check will flag any use of CMY inks.
A spot colour is shown in the InDesign swatches panel (from InDesign Window menu > Color > Swatches) with a small circle (a spot!) to the right of their name in the list of Swatches used in the document.

Adobe Spot and Process Colors help
‘Process Colours’ are the Cyan, Magenta, Yellow and Black inks used in the CMYK print process.
While the vast majority of commercial print jobs are printed in CMYK, some workflows use different combinations of inks – e.g. just two inks (duotone) or just three inks (tritone).
The use of limited spot colour inks, typically PANTONE inks, can give different design options and challenges and alter the cost of production and it is advised to check with production before using spot colours.
Typically, when producing a book with a limit number of spot inks, the Cyan, Magenta and Yellow plates are not required. This check will flag any use of CMY inks.
A spot colour is shown in the InDesign Swatches panel with a small circle (a spot!) to the right of their name in the list of Swatches available for the document. Choose InDesign Window menu > Color > Swatches to see the Swatches panel:
Fix by editing the colour to be a process equivalent or choosing an alternative process colour – e.g. from a Pantone process colour library.
Rotating spreads in InDesign can be handy when editing rotated text, such as on the spine of a book. However, on a technical level the spread rotation can affect the checking and outputting of spreads.
GreenLight will inform you of spreads that have been rotated:

Remove spread rotation using InDesign View menu > Rotate Spread > Clear Rotation.

Typically all text in the interior and prelims sections of co-edition books is placed onto text layers to make it available for translation.
However, in some cases we may want to fix non-translation text such names and numbers to the CMYK layer. Text on the CMYK layer is therefore common to every language edition.
Text on the CMYK layer is not restricted in the same way as text on the text layers and can be coloured using CMYK and have transparency effects used.
A document that intentionally contains text on the CMYK layer can be marked as an exception. This only needs to be done once per document. Once a document has been marked as OK, text on the CMYK layer is no longer flagged as an issue for that document.

The fact that a document has been marked as intentionally containing text on the CMYK is mentioned in the footer info of the GreenLight Report:

Anchored images have no effect on the reading order of Fixed Layout EPUB and so shoud not be used to indicate the reading order for InDesign documents destined for that type of output.
It is possible in InDesign to have multiple page sizes in the same document. This may be handy when creating digital publications or producing stationery, but it's usually a bad idea when working on a print publication.
This GreenLight check will inform you of pages that are a different size to the first page in the document.

Fix this problem by removing affected pages or resizing with the InDesign Page Tool.
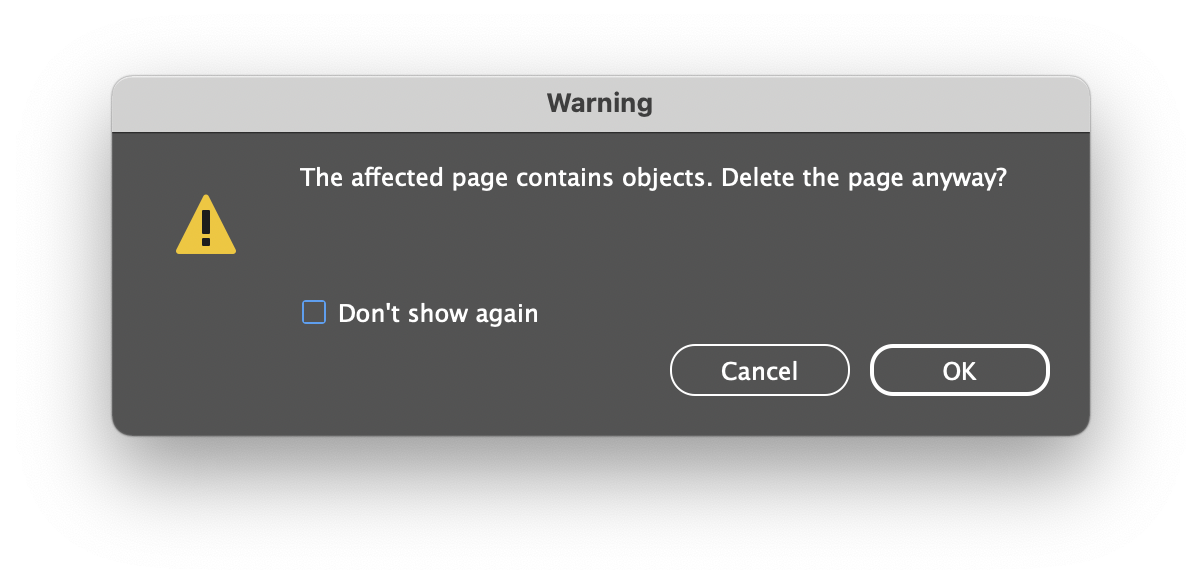
To remove a page choose InDesign Window menu > Pages, double-click the errant page thumbnail (NB, simply selecting it is NOT sufficient) and click the Trash button at the bottom of the panel. Unless the warning has been been switched off InDesign will give an alert dialog if the selected page contains objects. If so and you’re quite sure it is OK, click OK!
To resize a page, again firstly double-click its thumbnail in the Pages panel and select the Page Tool in the Tools panel:

Then in the Control panel (InDesign Window menu > Control) change the page's Height (H) and Width (W) as necessary.

NB: Objects on the page will adjust differently depending which option is selected from the Liquid Page Rule dropdown menu. E.g. Scale will aim to scale all objects proportionally to fit the new dimensions, Re-center will leave objects at their original size, centred in the new page. Off also leaves objects at their original size and resizes the new page to the position selected as the Reference Point at the left of the panel.
A text wrap (sometimes referred to as a ‘runaround’) is an InDesign effect to control how text can be pushed around an object, often an image.

Because the content of text frames and the position of text is editable by translators any text wrap objects are positioned on the TEXT layer.
Also, because images can be swapped or flattened as part of the process to prepare files for translation, by placing all text wraps on the text layer we remove the possibility of any text moving during that process.
Sometimes, to achieve the effect of wrapping text around an image, a text wrap object needs to be copied to the text layer and applied to an object with no fill or stroke colour.
To remove text wrap from an object, with the object selected, use the InDesign Text Wrap panel (InDesign Window menu > Text Wrap) and select the leftmost button to set ‘no text wrap’.
