
A bleed refers to printing that goes beyond the edge of the sheet before trimming. The bleed gives the printer a small amount of space to account for movement of the paper, slight variations in cutting, and other such factors. The purpose of the bleed is to ensure that no white space is visible around the edges of your document after it is trimmed to size.
This check verifies whether the document has been set up with a 0.125 inch bleed.
If you need to add or change your document's bleed, choose File > Document Setup to set a bleed area of 0.125 inches.
A bleed refers to printing that goes beyond the edge of the sheet before trimming. The bleed gives the printer a small amount of space to account for movement of the paper, slight variations in cutting, and other such factors. The purpose of the bleed is to ensure that no white space is visible around the edges of your document after it is trimmed to size.
This check verifies whether the document has been set up with a 10mm bleed.
If you need to add or change your document's bleed, choose InDesign File menu > Document Setup to set a bleed area of 10mm.
A bleed refers to printing that goes beyond the edge of the sheet before trimming. The bleed gives the printer a small amount of space to account for movement of the paper, slight variations in cutting, and other such factors. The purpose of the bleed is to ensure that no white space is visible around the edges of your document after it is trimmed to size.
This check verifies whether the document has been set up with a 3mm bleed.
If you need to add or change your document's bleed, choose File > Document Setup to set a bleed area of 3mm.
A bleed refers to printing that goes beyond the edge of the sheet before trimming. The bleed gives the printer a small amount of space to account for movement of the paper, slight variations in cutting, and other such factors. The purpose of the bleed is to ensure that no white space is visible around the edges of your document after it is trimmed to size.
This check verifies whether the document has been set up with a 5mm bleed.
If you need to add or change your document's bleed, choose InDesign File menu > Document Setup to set a bleed area of 5mm.
A bleed refers to printing that goes beyond the edge of the sheet before trimming. The bleed gives the printer a small amount of space to account for movement of the paper, slight variations in cutting, and other such factors. The purpose of the bleed is to ensure that no white space is visible around the edges of your document after it is trimmed to size.
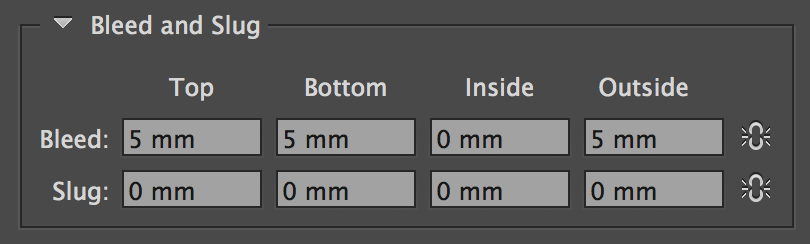
This check verifies whether the document has been set up with 5mm bleed to its OUTSIDE edges only. Setting the inside edge to zero removes the unnecessary addition of a section of the opposite facing page when exporting to a single page PDF.
If you need to add or change your document's bleed, choose File > Document Setup to set an Outside bleed setting of 5mm.
A bleed refers to printing that goes beyond the edge of the sheet before trimming. The bleed gives the printer a small amount of space to account for movement of the paper, slight variations in cutting, and other such factors. The purpose of the bleed is to ensure that no white space is visible around the edges of your document after it is trimmed to size.
Choose File menu > Document Setup, then:
For facing pages the bleed should be set to 5mm for the Top, Bottom and Outside edges, and set to 0mm for the Inside edge.
For non-facing pages the bleed should be set to 5mm for all sides.
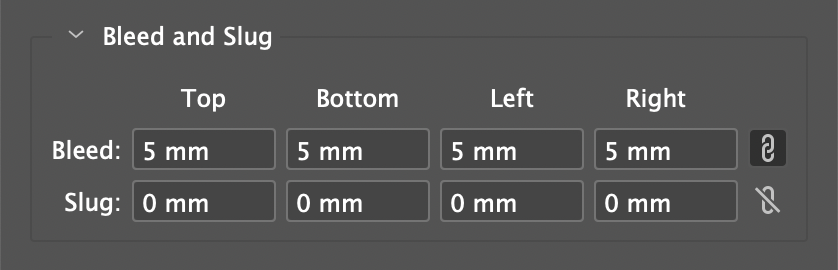
Notice that the labels for non-facing pages show as Left and Right rather than Inside and Outside for documents with facing pages.
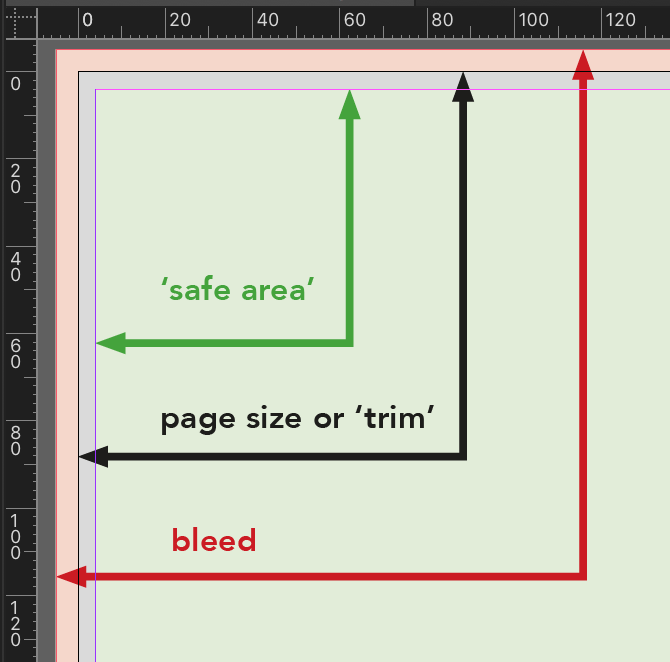
The printed pages of a book are usually trimmed down from the larger sheet that they are printed on as part of the production process. This process can have a tolerance of a few millimetres and so bleed guidelines are typically built in to prevent any unsightly errors.
This check verifies whether the document has been set up with 5mm bleed to OUTSIDE edges only. Setting the inside edge to zero removes the unnecessary addition of a section of the opposite facing page when exporting to a single page PDF.
A bleed refers to printing that goes beyond the edge of the sheet before trimming. The bleed gives the printer a small amount of space to account for movement of the paper, slight variations in cutting, and other such factors. The purpose of the bleed is to ensure that no white space is visible around the edges of your document after it is trimmed to size.
This check verifies whether the document has been set up with 0.25" bleed.
If you need to add or change your document’s bleed, choose File > Document Setup to set a bleed area of 0.25".
The printed jacket of a book is usually trimmed down from the larger sheet that it is printed on as part of the production process. This process can have a tolerance of a few millimetres and so guidelines are build in to prevent any unsightly errors.
By making sure all text is inside the ‘safe area’ of 4mm away from the edge of the page we can be confident that none of the text will appear too close to the page edge or even go missing during the trimming process!
This check looks at the position of the words inside all text frames and highlights any text that is within 4mm of the jacket edge, sometimes called the ‘trim’.
Fix this problem by moving the text back within the safe area.
The printed pages of a book are usually trimmed down from the larger sheet that they are printed on as part of the production process. This process can have a tolerance of a few millimetres and so guidelines are build in to prevent any unsightly errors.
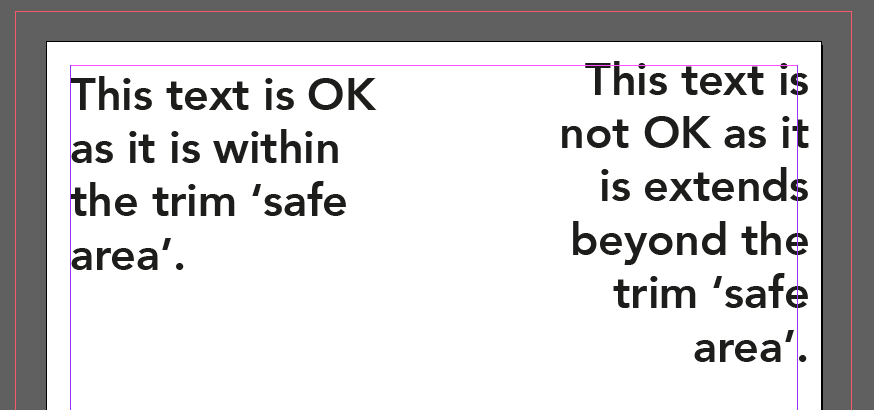
By making sure all text is inside the ‘safe area’ of 4mm away from the edge of the page we can be confident that none of the text will appear too close to the page edge or even go missing during the trimming process!
This check looks at the position of the words inside all text frames and highlights any text that is within 4mm of the page edge, sometimes called the ‘trim’.
Fix this problem by moving the text back within the safe area.
If text is intentionally being allowed into the trim area, or even off the page as a design choice, then an exception can be made:

The printed pages of a book are usually trimmed down from the larger sheet that they are printed on as part of the production process. This process can have a tolerance of a few millimetres and so guidelines are build in to prevent any unsightly errors.
By making sure all text is inside the ‘safe area’ of 4mm away from the edge of the page we can be confident that none of the text will appear too close to the page edge or even go missing during the trimming process!
This check looks at the position of the words inside all text frames and highlights any text that is within 4mm of the page edge, sometimes called the ‘trim’.
Fix this problem by moving the text back within the safe area.
The printed pages of a book are usually trimmed down from the larger sheet that they are printed on as part of the production process. This process can have a tolerance of a few millimetres and so guidelines are build in to prevent any unsightly errors.
By making sure all image that are outside of a ‘safe area’ of 4mm away from the edge continue off the page all the way to the bleed guide we can be confident that ‘bleed images’ will not appear with unsightly white edges.
This check looks at the position of the graphics that extend past the ‘safe area’ and highlights images within 4mm of the page edge that don’t fully bleed.

Fix this problem by moving images within the safe area or extending to the bleed area.